Training Times
| Saturday 12.00-2.00 | Sports Cage | Indoor | Mixed |
| Tuesday 4.00-5.00 | Sports Cage | Indoor | Co-ed |
| Wednesday 2.00-4.00 | Pantycelyn Field | Outdoor | Mixed |
| Thursday 4.00-5.00 | Sports Cage | Indoor | Mixed |
The main mixed training sessions are on Saturday and Wednesday, and the Co-ed (Co-ed is a form of ultmate where an equal number of men and women are on the pitch at the same time ) session takes place on Tuesday. The Thursday afternoon session is generally in the form of a game, to give everyone more pitch time.
It is recommended that people bring football boots to outdoor practices and clothing suitable to the conditions. Also make sure you bring plenty of water to all training sessions
Hints & Tips
This section contains tips and hints which will help with throws and basic play and is well worth consulting if you are new to the sport
BASIC RULES
| 1) Spirit of the game – It’s assumed no ultimate player will deliberately commit a foul, and there are no harsh penalties for doing so, but rather a method for starting play in as fair a way as possible | |
| 2) The Pitch – Ultimate is played on a grass pitch totalling 120 yards long by 40 yards wide. | |
| 3) The Pull – Seven members of each team stand at opposite end zone lines. The pulling team (or defence) then throws the disc as far as they can towards the recieving team (the offence) | |
| 4) Offence – A member of the offence catches or picks up the disc and tries to work it up the field by passing it to team-mates. You may not run while holding the disc, but must keep one foot (the pivot foot) stationary, as in basketball or netball, and you may only hold the disc for 10 seconds at a time. | |
| 5) Defence – The aim of the defence is to try to gain possession by forcing a turnover. The usual way to do this is through man marking, where each defensive player takes one member of the opposite team and tries to close them down. | |
| 6) The Turnover – A turnover occurs whenever a pass is incomplete. This may be because of a drop, if the disc goes off the field (out of bounds), or if the defence intercepts or knocks down a pass. Also a turnover occurs if an offensive player holds it for more than 10 seconds (a stall out). Whenever a turnover occurs the defensive team becomes the offence and vice versa. The new offensive team then picks the disc up and tries to play it towards the opposite end zone. | |
| 7) Scoring – A goal, or point, is socred when one team manages to complete a pass into their opponents endzone. If the catch is made in mid-air then the first posint of contact with the ground must be in the endzone, be it with the foot, body or hand. If the catcher is on the ground then all contact must be inside the zone – one foot in and one foot out counts as not in. If the catch is made outside of the zone, but the recievers momentum carries them in, then they must walk back out of the zone and play from the line | |
| 8) Change of Ends – After each point is scored the defensive team, whcih conceded the point, must walk back to the opposite endzone. The team which has just scored then pulls the disc to them. In effect this means that the team that lost the point gets first possession, and that the two teams change ends each point | |
| 9) Fouls – A foul occurs in Ultimate whenever one player initiates contact with another. The person who has been fouled declastd this (and gets the disc back if the foul caused them to lose it). Other infringements include strips (where the disc is pulled out of someone’s hand), travelling, and picks (a type of obstrcution, like a screen in basketball). | |
| 10) Matches – A full length match is to 21 points and 2 points clear of the opposition, and usually last 2 hours (they can take over 4). | |
BASIC DEFENCE TACTICS
In Ultimate the shape of play is essentially decided bu the defence. This is because with the right defensive tactics it should be possible to close down any given offensive move (although no tactics allow you to close down all moves), and therefore the offence have to work around the problems posed by the defence
 There are a few basic deifferent types of defence, but by far the most common,and also one of the most effective, is man-on-man, which is explained here.
There are many different individual skills to good defence but the usual overall shape is shown to the right. One defensive player will force the man with the disc to one side, while his team-mates each mark another offensive player. They stand on the open side (in front of or behind) as that is by far the easiest space to throw into, and therefore probably the way the men will run. This way both options can in theory be closed down.
The Pull – Whilst the main objectove of the pull is to get the disc as far down the field as possible, there are other concerns. It is generally best to fet the pull to land in bounds, as otherwise the offence can take it to the center of the pitch, the hardest place to defend from – a good pull will land right next to the sideline. It is also best to try and shut down the defence as soon as possible, so other members of the defensive team should start running from behind the endzone line before the pull is made, so that the moment the disc is released they are at the line and running at full speed
Marking up – During a point you will be marking one opponent, who will probably mark you back if your team gets possession. If your opponents do call a switch (change markers while they are on defence) you should mark your new marker when you’re next on defence. Usually the person you line up against (stand opposite) on the pull will be your mark, but sometimes defensive players call switches on the line.
Marking – The main element of defence is trying to prevent your mark from recieving the disc. This can be very hard if you have a fast opponent, but positional sense makes a big difference. When your man is stationary, usually in the stack, you have some choice of where to stand. Standing just behind or to the side allows you to watch both the man and the disc at once, but gives him a slight head start. The other method is to always keep ytour body between your mark and the man with the disc, always facing your mark. This way your man cannot simply outrun you to the disc, but it has the disadvantage that the disc can be thrown around you without you knowing until too late.
These two techniques both have their place. It is never a good idea to stand infront of your mark if they are towards the rear of the stack, as they might simply turn and run towards the endzone and collect a long pass to score. People at the front of the stack are less likely to do this, and you have more time to make up ground, so marking in front becomes a better option
The Force – Once your man has possession of the disc, your next job is to limit his options in terms of the area of the pitch which he can throw to. This is done by standing on one side of hime, using your body to prevent the throw in that direction, and using your arms (or sometimes legs) to try to block the discs as soon as it leaves his hand (a point block)
The most common mistake in forcing is to try to block every throw, as in the first picture (above). A good player will be able to make a throw form about two yards either side of their pivot foot, and will be fast enough to throw whichever side of you they choose. Far better is to make your force definate so your team-mates know which way the pass is likely to go, and therefore whcih way their man is likely to cut
Stalling – No offensive player may hold the disc for more than ten seconds at a time. The way this is enforced is through the defender presently marking (and presumably forcing) them counting out, called stalling. In order to stall you must be within 3 yards of the man and say, loud enough for him to hear, “Stalling…One…Two…” with a second interval between each. On reaching the word ten a turnover occurs. If the count is too fast the man in possession simply calls “Fast count”, and the defender continues stalling (at the right speed) from two below the last number.
Direction of Force – When your mark gains possession you will have a choice of two directions in which to force. You should always let your team-mates know your choice by shouting “Sidearm force” or “Backhand force” (treat all players as right handed for this purpose). This decision is fairly arbitary unless the disc is near the sideline (when you may call “Force line” or “Force middle” instead).
SIDEARM THROWS
Flat Sidearm
 This is a cool throw. It’s a bugger to learn at first but it is definitely one to impress your friends with. It is without doubt very useful and for some players it has superceded the backhand as their “instinctive” throw. The forehand is not thrown across the width of the body, like in the backhand; instead it is released from the hip. If you throw with your right hand you release the disc when it is alongside your right hip. It is the wrist action which provides the spin and drive to make the disc travel though experienced players are able to use arm action as well to send the disc flying for much further distances.
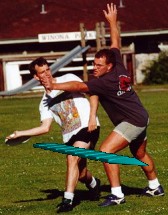
Two examples of throwing a forehand. Right is a Bliss player showing a good example of a forehand, Flying Eggs defender tries in vain to block the pass. Below the forehand pass is typically thrown around hip height, with a strong wrist action. The disc is slanting slightly downwards and held with a relaxed grip.
 Why is it used? Sometimes a defender will mark you in such a way which makes a backhand pass impractical, so this throw becomes very useful indeed. There are a couple of ways to grip the disc for this kind of throw, both of which are unusual. The simplest way (though the purists may object) is by placing forefinger and middle finger against the rim, underneath the disc. The thumb rests on top of the disc and the grip should be relaxed. Prior to the throw the disc should be slanting slightly downwards (top of the disc facing away from you). Standing squarely to the person you which to pass to, without moving your hips or shoulders and using as little arm movement as possible flick the wrist and release the disc when it appears to be alongside your hip. Don’t be discouraged if your early attempts look naff, they have all had to start somewhere. Keep practicing (or seek help) and through persistence, you will get it right.
Outside-In Sidearm Curl
Another throw that can be used to make the disc fly around opponents or beat a strong crosswind. Similar to the normal forehand throw the disc is tilted towards the body, top of the disc facing inwards before the throw. The greater the tilt of the disc the more the disc will curve in flight.
 Left: Bisto showing an example of an outside-in forehand pass. The greater the tilt when throwing the disc the more its’ flight will curve. Again, in this example the curved flight of the disc has been exaggerated.
Inside-Out Sidearm Curl
A forehand throw that curls in the opposite way anyone would expect it to. It’s a tricky throw to pull off but it can be used to get around the defence the opponent has put on you. It somewhat twists the rules of throwing a forehand which is what makes it weird to learn.
 Right: Bisto showing an example of an inside-out forehand pass.
The pass is similar to the normal forehand in the way you grip the disc and in the stance. What is different is the way you throw it ~ the disc is thrown across the width of the body instead of alongside the hip as is usually done with the normal forehand pass.
It isn’t a pass that is seen that often because it isn’t easy to do. As with any of the passes they have described here, you may require practice, persistance or help to get it right but if you stick with it long enough you will master them all.
BACKHAND THROWS
Flat Backhand
The most common throw, the one which anyone who has ever thrown a disc will instictively use. The player throws the disc forward as well as across the body, with the disc held horizontally. A sharp flick of the wrist just prior to release is required to get the disc spinning which is essential for long, level flight on a windy day. It’s easy, nuff said.
Example of a backhand pass (right), the disc is thrown forward and across the width of the body. Mwnci See at practice: Flea sets up a point for his team with a backhand pass to the endzone, Steve tries hard to block the pass.
Outside-In Backhand Curl
This throw is one of many players can use to make the disc fly around opponents in front of them. Similar to the normal backhand throw the disc is thrown forward and across the width of the body. However the disc is tilted towards the body, top of the disc facing inwards before the throw. The greater the tilt of the disc the more the disc will curve in flight.
Rob showing an example of an outside-in backhand pass (right). The greater the tilt when throwing the disc the more its’ flight will curve. Again, in this example the curved flight of the disc has been exaggerated.
Making the disc curve in flight has another use in overcoming a crosswind when playing outdoors. A straight flatback pass to another player in strong crosswind will probably make the disc to fly off course. The crosswind might even flip the disc over in mid-flight. The trick to get around this is to throw the disc at an such angle that the crosswind hits the top of the disc rather than allow it to get underneath.
THE HAMMER
The hammer
This throw is unusual in the way it flies. The disc starts its’ flight almost vertical, then during flight it flips itself upside down for the reminder of the time it is airborne.
Left: Bisto demonstrates a hammer throw. The upward curved flight of the disc is exaggerated in this example.
Again a sharp flick of the wrist prior to release is important. The disc can be made to travel very far but its’ accuracy cannot be relied on. It is a useful throw to make if you wish to make the disc travel far to open spaces or if you are really stuck for a person to throw to, the stall count is getting high and you badly need to get rid of the disc.
The grip is the same for a forearm but the disc is held vertically, slightly tilted towards the head, then thrown upwards and forwards from the side of the head.
Left: A Mir San Mir player about to throw a hammer